
ICT (Inner Circle Trader) Mitigation Block in Forex Trading: A Complete Guide for Smart Money Concept Traders
In this session, we will delve into the “ICT Mitigation Block in Forex Trading,” one of the most underrated yet powerful concepts within the Smart Money Concept (SMC) framework.
The Mitigation Block (MB) is an effective ICT entry model every smart money trader should know and master. While it is not as strong as the Breaker Block (BB) in terms of reliability, it has its unique advantages and can offer high-quality trade entries when used correctly. However, if applied incorrectly, it can expose you to losses.
One of its standout qualities is that Mitigation Blocks occur more frequently in price action than Breaker Blocks, making them easier to spot. Many professional traders successfully use them to secure profitable trades. Even beginners can quickly learn to identify and apply them effectively.
That said, remember this: Forex is a high-risk venture. No strategy works 100% of the time. Every trading setup is based on probability, not certainty. This is why it’s essential for beginners to practice and master any trading concept on a demo account before risking real capital. If you can’t make consistent profits on a demo account, you won’t be profitable with real money. There is no “magic formula” in forex trading, only skill, patience, and discipline.
When applied correctly, the Mitigation Block can significantly improve your profitability. In this lesson, we’ll explain exactly what a Mitigation Block is, how it works, and how to trade it step-by-step.
What is a Mitigation Block in Forex Trading?
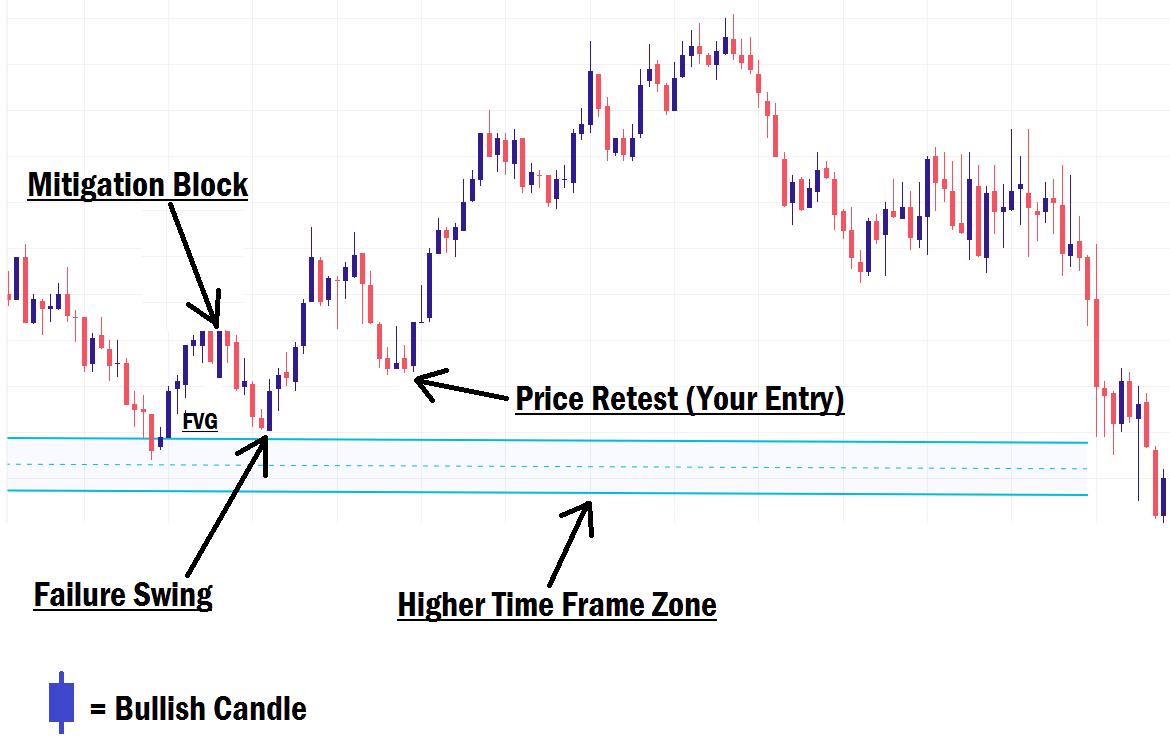
A Mitigation Block is a price action formation that occurs when price fails to create a new swing high or swing low before reversing in the opposite direction, typically due to the presence of an Order Block (OB) or an unmitigated Fair Value Gap (FVG).
This failure swing creates a prime opportunity for Smart Money Concept traders to enter high-probability trades when price later breaks and retests the Mitigation Block.
In simpler terms:
A Mitigation Block is the last bullish or bearish candlestick in a price swing that institutional traders use to mitigate an Order Block or Fair Value Gap before price either continues in its original direction or makes a short-term reversal (retracement).
A Mitigation Block is the last bullish or bearish candlestick in a price swing that institutional traders use to mitigate an Order Block or Fair Value Gap before price either continues in its original direction or makes a short-term reversal (retracement).
- Breaker Block vs. Mitigation Block: Both are similar, but the key difference is that the Mitigation Block is primarily used to mitigate OBs or FVGs without sweeping liquidity, while the Breaker Block is designed to sweep liquidity before forming a new price range.
The Purpose of a Mitigation Block
The main purpose of a Mitigation Block is to clear or mitigate an existing OB or FVG before price resumes its movement. Once an OB or FVG has been mitigated, either by the wick or body of a candlestick, its ability to act as strong support or resistance is reduced, making it less attractive for future trade setups.
- Bullish Mitigation Block: The last bullish candle in a swing that mitigates a bullish OB or FVG before continuing upward.
- Bearish Mitigation Block: The last bearish candle in a swing that mitigates a bearish OB or FVG before continuing downward.
A critical insight here: Price almost always returns to clear any liquidity left by a Mitigation Block. This means traders should approach them with caution; they often signal short-term retracements, not major trend shifts.
Because of the fractal nature of market structure, a retracement on a higher time frame can look like a full trend on a lower time frame. Understanding this is key to applying Mitigation Blocks correctly.
How to Trade Using a Mitigation Block
Trading with a Mitigation Block is straightforward but requires precision. Here’s the general process:
- Identify the Formation
-
- Look for a price swing where price fails to create a new high/low and instead reverses due to an OB or FVG.
- Wait for the Break & Retest
-
- Once the Mitigation Block forms, price usually breaks through it and then returns to retest it as a support or resistance level, depending on the direction of price.
- Enter at the Retest
-
- Smart Money Concept traders typically enter their positions during the retest phase, using the MB as a confirmation of their bias.
- Align with Key Zones
-
- Mitigation Blocks are more effective when they align with significant zones, such as a higher time frame OB, supply/demand zone, or a premium/discount price area.
Example Trade Setup:
Let’s say you have marked a higher time frame resistance zone or bearish Order Block where you expect price to reverse.
- Step 1: Drop down to your lower time frame for entries.
- Step 2: Wait for price to reach your higher time frame zone.
- Step 3: Look for a Mitigation Block formation.
- Step 4: Once price breaks the MB, wait for the retest.
- Step 5: Enter your position on the retest.
- Step 6: Place your Stop Loss (SL) below the failure swing caused by the MB.
- Step 7: Target at least 2:1 Risk-to-Reward or more, depending on the next liquidity draw.
Note: Mitigation Blocks do not always signal long-term reversals. Price may quickly return to clear them, so they are best used for short-term trades or retracement plays.
Final Thoughts
Mitigation Blocks are an effective SMC tool when used in the right context. While they appear frequently and can offer profitable opportunities, they are not as strong as Breaker Blocks for long-term reversals.
Our years of trading experience show that price often revisits these areas to clear liquidity, so you must trade them with caution. The best approach is to practice extensively on a demo account, refine your skills, and integrate them into a broader trading plan before committing real money.
In our next lesson, we will explore PD Array (Premium and Discount Array). Stay tuned, it’s going to be a game-changer!


