
Mastering the ICT Breaker Block in Forex Trading
In this session, we will be diving deep into “Mastering ICT Breaker Block in Forex Trading.”
If you are a Smart Money Concept (SMC) trader and you do not know what a breaker block is, you are already a step behind. In the ICT (Inner Circle Trader) methodology, the Breaker Block (BB) is one of the most powerful and reliable entry models you must not only understand but truly master.
When you approach breaker blocks with the right knowledge and precision, you can consistently secure high-quality trade entries in the foreign exchange market, entries that can dramatically boost your profitability. On the other hand, failing to identify and trade them correctly can expose you to unnecessary and significant losses.
As always, remember: no strategy in forex works 100% of the time. Trading carries risk at every level. That’s why you should learn, practice, and master your strategy on a demo account before committing real funds to the live market. If you can’t be consistently profitable in a demo environment, you’re unlikely to succeed when trading with real money.
Among all ICT’s smart money entry models, breaker blocks stand out because of their simplicity, effectiveness, and ability to boost confidence when entering the market. In this lesson, we will break down what a breaker block is and how to trade with it like a professional.
What Is a Breaker Block in Forex Trading?
According to ICT, a breaker block is essentially a failed order block that leads to a significant shift in market liquidity and often results in a change in market structure, either from bullish to bearish or vice versa.
When an order block fails to hold price as expected, it transforms into a breaker block.
In simple terms:
A breaker block is an order block used by institutional players to sweep liquidity from a significant swing high or low before creating a new price range. Its purpose is to grab liquidity before price either resumes its original direction or completely reverses to the opposite direction.
Types of Breaker Blocks
- Bullish Breaker Block
- The last bullish candlestick before price reverses and sweeps liquidity on a swing low, followed by another reversal to form a bullish dealing range.
- Bearish Breaker Block
- The last bearish candlestick before price retraces and sweeps liquidity on a swing high, followed by another reversal to form a bearish dealing range.
Once a breaker block forms, price often establishes a valid dealing range.
How to Trade with a Breaker Block
After a breaker block sweeps liquidity from a high or low, price usually reverses and crosses back over the breaker block. It then uses the breaker block as a key support or resistance level before continuing in the direction of the new dealing range.
ICT’s core theory behind breaker blocks is:
After price reverses and crosses a breaker block, it will often come back to retest that breaker block before continuing its move.
The retest phase is your ideal trade entry point.
Trading Tips for Breaker Blocks
- Use Them in Key Zones: Breaker blocks work best when they align with higher time frame order blocks or major support/resistance zones.
- Combine With Market Structure Shifts: If a breaker block coincides with a market structure shift, it’s a strong sign of a full reversal.
- Top-Down Analysis:
- Identify key zones or order blocks on the higher time frame.
- Drop down to a lower time frame for precise entry signals.
- Wait for a breaker block to form in your pre-identified zone.
- Wait for Break and Retest: After the breaker block forms, allow price to break through it and retest before entering your trade.
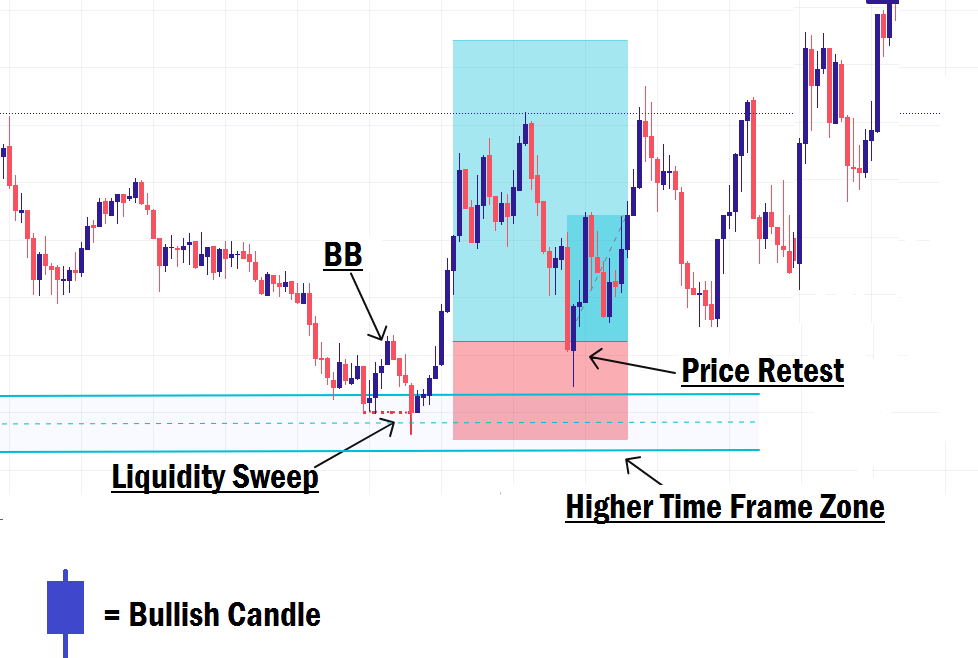
Example: Trading a Bullish Breaker Block
- Mark a bullish zone (support area) or order block on your higher time frame.
- Drop to your lower (entry) time frame and wait for price to retrace into your marked zone.
- Once price enters the zone, wait for a breaker block to form.
- After formation, wait for price to break above the breaker block and retest it.
- Enter your trade on the retest, set your Stop Loss (SL) just below the swing low formed by the breaker block, and aim for at least a 2:1 or 3:1 reward-to-risk ratio (or more, depending on your plan).
For a bearish breaker block, follow the same process in reverse, marking resistance areas or bearish order blocks and looking for bearish breaker blocks.
Final Thoughts
Breaker blocks are powerful, but they are not a holy grail strategy. They can fail depending on market conditions, so risk management is critical. Practice on a demo account, refine your entry precision, and always confirm breaker block setups with higher time frame analysis.
Used correctly, breaker blocks can be a game-changing entry model in your SMC trading toolkit.
In our next lesson, we will dive into “Mitigation Blocks (MB).” You won’t want to miss it.


