Mastering Forex Trading with Order Blocks
In today’s session, we will explore one of the most powerful institutional trading concepts in forex, “Trading with Order Blocks Effectively.”
The Order Block (OB) strategy is a highly respected concept introduced by ICT (Inner Circle Trader) and has gained widespread acceptance among professional forex traders. It’s a method that focuses on tracking the footprints of institutional traders, often referred to as “smart money.” When properly understood, practiced, and mastered, the order block strategy can simplify your trading and help you capture high-probability trade setups. However, using it incorrectly can lead to significant losses.
If you’re ready to enhance your trading skills, let’s dive deep into how to use order blocks the right way.
What Is an Order Block in Forex? (According to ICT)
An Order Block is a price zone where large financial institutions and banks place massive buy or sell orders. These zones typically precede a strong and impulsive price movement, indicating institutional interest.
Technically, an order block is:
- The last bearish candle before a bullish impulsive move (Bullish Order Block), or
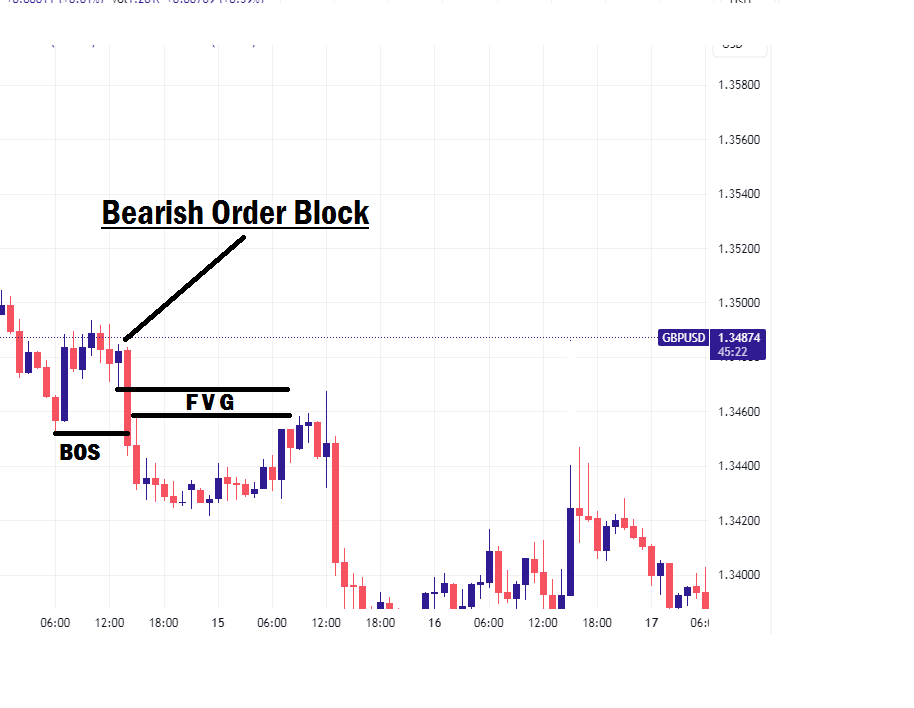
- The last bullish candle before a bearish impulsive move (Bearish Order Block).

These areas are often located at key support or resistance zones and usually lead to a Break of Structure (BOS) or Market Structure Shift (MSS), both essential for identifying trend reversals or continuations.
When you spot an order block, understand this: Institutions have stepped into the market. These zones are their footprints, and they are likely to defend them, at least the first time price returns to them.
The Power and Logic Behind Order Blocks
According to ICT methodology, order blocks represent where institutional traders have placed large orders. When price moves impulsively from these zones, it often leaves behind imbalances or inefficiencies (also called Fair Value Gaps – FVG).
Retail traders can use these zones to:
- Identify potential entries after price retraces to the OB zone
- Set precise stop losses and take profits
- Align with the market’s real movers, the institutions
However, once an order block has been mitigated (i.e., price has returned to it and touched it), it becomes invalid for future entries. Re-using a mitigated OB is a low-probability move.
Understanding Fair Value Gap (FVG)
A Fair Value Gap (FVG) occurs when there’s an imbalance in price caused by aggressive buying or selling. It typically shows up on the chart as a three-candle formation where the wick of the third candle does not fill the gap between the first and second candles.
In simpler terms, price moves so quickly that it skips some levels, leaving behind a “gap” or inefficiency. Price often returns later to fill or mitigate this gap, creating an opportunity for traders.

When price only retraces halfway into the FVG, this is called Consequent Encroachment. It signals a strong possibility that price may return to fully fill the gap and mitigate the OB.
How to Identify a Valid Order Block
For an order block to be considered valid and strong, it must meet the following criteria:
- Cause a Break of Structure (BOS) or Market Structure Shift (MSS)
- Create a Fair Value Gap (FVG) or imbalance
- Lead to a significant price displacement with strong momentum
The most powerful order blocks are those that lead to a market structure shift, as they often signify a major change in trend.
How to Trade Order Blocks Effectively
To successfully trade using order blocks, follow these steps:
Step 1: Top-Down Analysis
Start by identifying the overall market direction on higher timeframes (Daily, H4, or H1). Look for areas of interest where price previously made strong impulsive moves with a break of structure and FVGs.
Step 2: Mark the Valid Order Block
On your chosen higher timeframe, mark the valid order block, the last candle before the impulsive move. It becomes your key area of interest, also known as “point of interest (POI).”
Step 3: Wait for Price to Return
Patiently wait for price to return to this OB zone to mitigate it. Avoid entering immediately. Instead, wait for confirmation on a lower timeframe (5M, 3M, or 1M).
Step 4: Entry Confirmation
Once price taps into the OB, drop down to a lower timeframe to look for a clear Market Structure Shift (MSS). It could be a break of a lower high in a downtrend or a higher low in an uptrend.
- Entry: After MSS confirmation
- Stop Loss: Below the low (for buys) or above the high (for sells) of the shift
- Take Profit: Target at least 3x your risk or higher
Example: Bullish Order Block Trade Setup
Let’s say you spot a bullish order block on the H1 chart. You mark it, then wait for price to return. As soon as price enters the OB zone, drop to the 3M or 5M chart and look for a market structure shift. Once that happens:
- Enter the trade
- Place your SL below the MSS low
- Set your TP at a risk-reward ratio of 1:3 or more

Repeat the same process for bearish order blocks, in the opposite direction.
Final Thoughts
Not all order blocks are created equal. Some are wick-based, others are strong body-based. The strongest OBs are those formed after a liquidity sweep and aligned with the overall market trend.
The forex market operates on probabilities, not guarantees. That’s why proper risk management, patience, and discipline are crucial.
Before using any strategy in a live market, always backtest and practice it on a demo account. If you can’t be consistently profitable on demo, you won’t succeed with real money.
Keep sharpening your skills, developing your edge, and understanding the logic behind institutional moves, and you’ll be well on your way to becoming a confident and profitable trader.
Coming Up Next!
In the next lesson, we will explore “Effective Ways to Trade Using the RSI Indicator.” Don’t miss it!

