
Understanding What the ICT Dealing Range Theory Is in Forex Trading
In today’s session, we will be diving deep into “Understanding What the ICT Dealing Range Is in Forex Trading.”
The ICT (Inner Circle Trader) Dealing Range Theory (DRT) is a powerful price action concept that helps traders identify where and when to take trades in the forex market. Mastering this concept can completely transform your trading mentality, especially if you are a beginner or a struggling trader. Once you understand how dealing ranges work, you will stop taking random trades and start executing well-planned, high-probability entries.
Forex trading is a high-risk business because price movements are full of uncertainty. To be consistently profitable, you must learn to take calculated risks rather than gamble on the market’s next move. No strategy, no matter how reliable, delivers a 100% win rate. That’s why it’s essential to learn, practice, and master any trading method on a demo account before risking your real capital in the live market.
One of the major challenges new traders face in the foreign exchange market is knowing where to anticipate quality trade entries. It is exactly where the ICT dealing range comes in, helping you identify precise zones of interest.
In this lesson, we’ll cover:
- What a dealing range is
- How to recognize a valid dealing range
- How to use dealing ranges to plan trades effectively
What Is a Dealing Range in Forex Trading?
According to ICT, a dealing range is simply the price area between an established swing high and swing low, where liquidity has been taken from both the buy side and the sell side.
This range represents a zone where institutional traders are actively involved in buying, selling, and often manipulating prices to trigger stop-losses before entering at better prices. Understanding dealing ranges is key to identifying liquidity zones and predicting potential price moves within the market structure.
However, not every swing high and swing low forms a valid dealing range. There are specific attributes that make a dealing range valid and worth trading.
How to Recognize a Valid Dealing Range
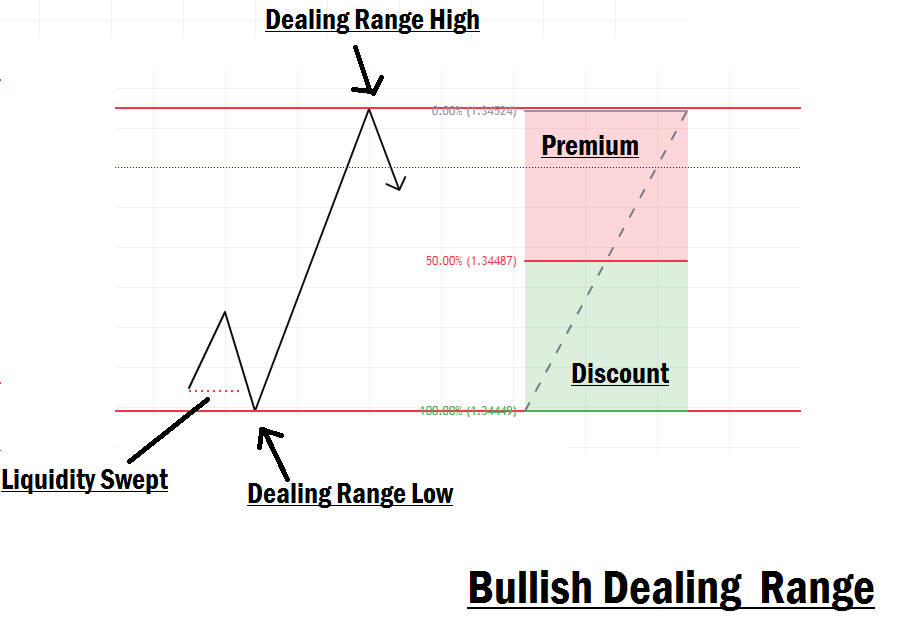
A dealing range is considered valid when liquidity is swept before the range is formed.
- In a bullish scenario, price sweeps liquidity below a key low before forming a higher high (HH).
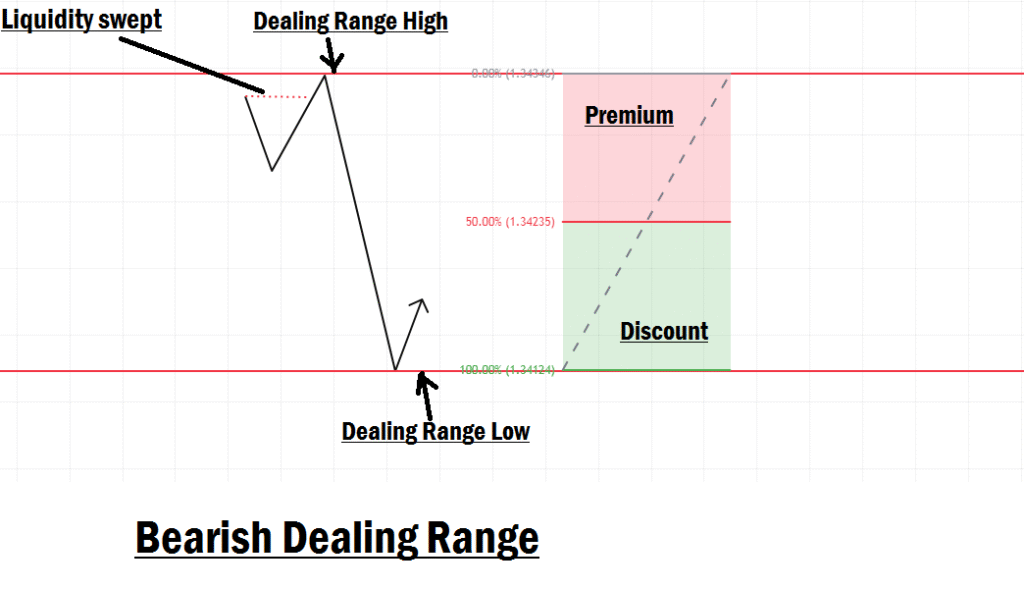
- In a bearish scenario, price sweeps liquidity above a key high before forming a lower low (LL).
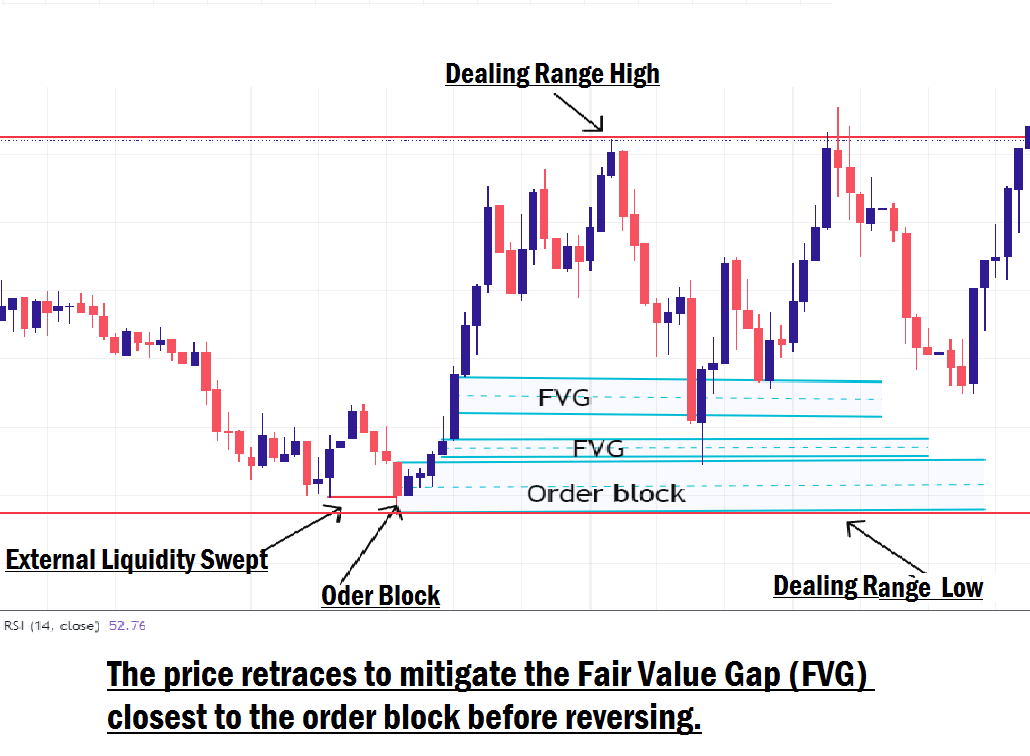
Once this liquidity sweep occurs, the market creates a range between the swing high and swing low. It offers a high-probability trading opportunity when price retraces into the premium or discount zone to tap into internal range liquidity and mitigate Fair Value Gaps (FVGs) or Order Blocks.
Dealing Range Theory Explained
When a dealing range forms:
- Price establishes a higher high (HH) or lower low (LL), sweeping external liquidity in the process.
- Price then retraces back into the range to clear internal liquidity and mitigate any FVG or Order Block inside the premium or discount zone (depending on trend direction).
- Bullish Dealing Range: Price will often retrace into the discount zone (below the 50% level of your Fibonacci measurement) to tap liquidity and mitigate an Order Block or FVG before resuming upward to clear external liquidity.
- Bearish Dealing Range: Price will often retrace into the premium zone (above the 50% Fibonacci level) for the same purpose before resuming downward.
How to Trade Using a Dealing Range
To trade a dealing range effectively:
- Identify the Range
- Wait for price to clear external liquidity and establish a range (swing high to swing low).
- Measure the Range
- Use your Fibonacci retracement tool from the swing high to the swing low.
- Identify Points of Interest (POI)
- Look for Order Blocks or FVGs inside the premium (bearish) or discount (bullish) zone.
- Prioritize the FVG closest to the Order Block; institutional traders often target these for entries.
- Execute the Trade
- For a bullish range, wait for the price to retrace into the discount zone and tap into the FVG near the Order Block. Enter your buy, place your stop loss just below the Order Block, and set your take profit at the swing high.
- For a bearish range, wait for the price to retrace into the premium zone and tap into the FVG near the Order Block. Enter your sell, place your stop loss just above the Order Block, and set your take profit at the swing low.
- Refine Entry with Lower Timeframes
- Drop to a lower timeframe (e.g., M5 or M1) to look for a Market Structure Shift (MSS) inside your POI for a more precise entry.
- Keep your stop loss below (bullish) or above (bearish) the MSS point.
Example: Bullish Dealing Range
Suppose you spot a bullish dealing range:
- Measure from the range high to the range low with your Fibonacci tool.
- Wait for price to retrace into the discount zone.
- Identify the FVG closest to the Order Block.
- When price taps it, enter your buy trade, place your stop loss just below the Order Block, and target the range’s swing high.
- If you want even greater precision, refine your entry by spotting an MSS on a lower timeframe.
Final Thoughts
No trading method is flawless; losses are part of the game. The goal is to stack the odds in your favor with high-probability setups like the ICT Dealing Range Theory.
We strongly recommend practicing and mastering this strategy on a demo account before using real money. Build confidence, refine your execution, and make the concept second nature.
In our next lesson, we will explore “Breaker Blocks (BB).” See you there!


